
I’ve been using KMS activation for several years for our Windows devices. This has traditionally worked well in our environment, as devices were frequently connected to our network. Since the coronavirus pandemic, things have been far from traditional. Machines we imaged in August are now approaching 180 days away from the network, leading to Windows activation messages.
Windows Subscription Activation?
If the proper licensing is available for your organization, Windows Subscription Activation looks like the logical choice for licensing devices. Unfortunately, I saw some inconsistencies with this approach. I am not certain if this was due to differing OEM licensing embedded in the firmware across our different generations of devices. In the end, we opted for changing the KMS activation over to a MAK key available through our volume licensing.
This post will outline how I deployed a configuration baseline with detection and remediation scripts to change offsite device licensing to MAK.
*Note offsite machines communicate with the MEMCM server through the Cloud Management Gateway.
Obtain Enough MAK Keys
For starters, you will need to ensure your volume licensing includes enough MAK licenses to cover your deployment. For larger deployments, Microsoft still recommends configuring a KMS server and therefore doesn’t typically give you the proper amount needed in the Volume Licensing Service Center. Being devices are off network with no VPN, moving to MAK is a better choice in this scenario. There is a request form you can fill out to request an increase in MAK activations. Once you have a suitable amount of activations available, you are ready to create the configuration item.
Detection Script
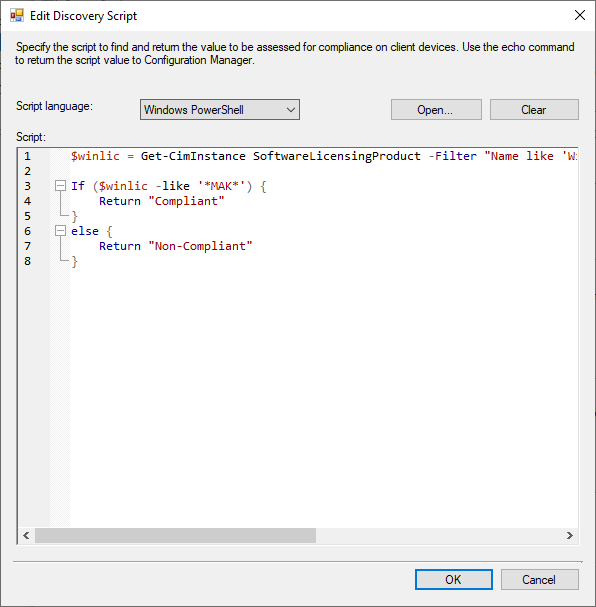
The detection script is a simple PowerShell script to populate a variable with the licensing description, then checking to see if the variable contains the pattern of “MAK” within the string. If so, you are already on MAK and compliant is returned. Else, Non-Compliant is returned. Save this as a PowerShell ps1 file for use later.
$winlic = Get-CimInstance SoftwareLicensingProduct -Filter "Name like 'Windows%'" | where { $_.PartialProductKey } | select Description

If ($winlic -like '*MAK*') {
    Return "Compliant"
}
else {
    Return "Non-Compliant"
}
Remediation Script
The remediation script is simply installing your MAK product key with Windows built in slmgr.vbs script. Save this as a PowerShell ps1 file for use later.
slmgr.vbs -ipk "XXXXX-XXXXX-XXXXX-XXXXX-XXXXX"You can test both of these scripts on a machine manually using PowerShell ISE. The detection can be run with a standard user account. To test the remediation, you will need administrative permissions. Note: running the remediation script will flip your test device to MAK.
Create Configuration Item
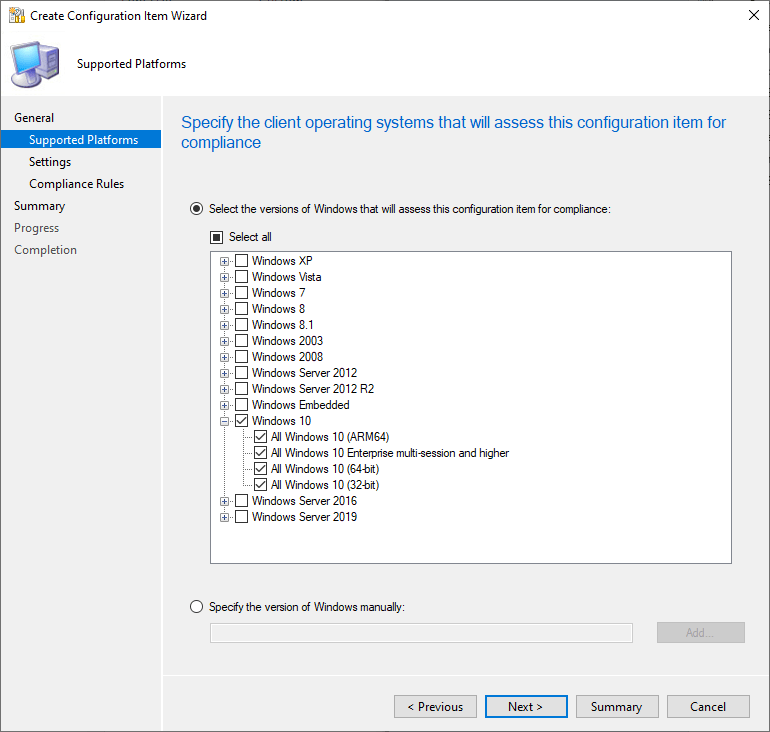
Within the MEMCM console, select Assets and Compliance, then expand Compliance Settings, Configuration Items. Click Create Configuration Item in the ribbon to launch the wizard. Give the CI a name, and select Windows Desktops and Servers (custom) for the type.

Select which versions of Windows you need to convert. In this case, I am applying a Windows 10 MAK key, so I only selected Windows 10.
Click on New on the settings page.

On the Create Setting page, type a name, select Script for the setting type, String for the data type.

In the Discovery Script section, click on the Edit Script… button. In the Edit Discovery Script window, ensure the script language is Windows PowerShell, then click the Open… button, browse to your detection script you created earlier, and verify the script appears in the Script window. Click OK to return to the Create Setting window. Repeat the same steps for the Remediation Script section, this time selecting the remediation script you created earlier.
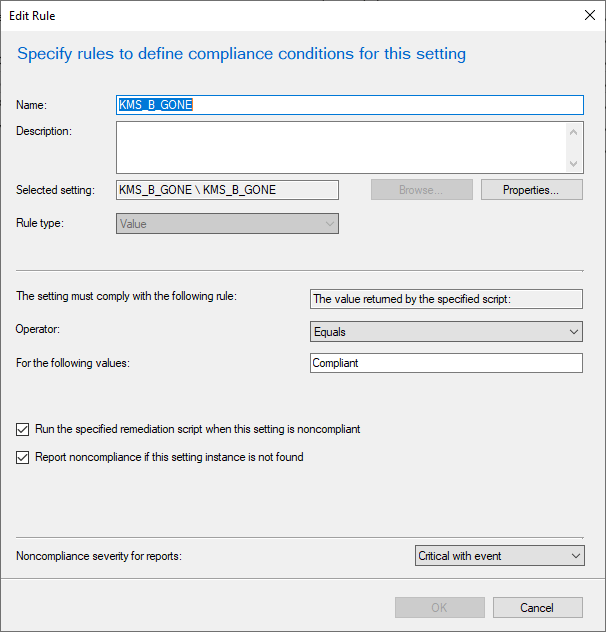
Click on the Compliance Rules tab, then click the New… button.

In the Edit Rule window, type a name. Click browse next to selected setting and choose your script name, then click select. Type in Compliant in the For the following values: box. Check the two boxes to remediate when non-compliant and report, and choose a non-compliance severity from the dropdown. Click OK to close the edit rule window, then click OK again to return to the wizard.
Click Next, then Next again on the Compliance Rules section, then next to complete the wizard. This will result in a CI listed.
Create Configuration Baseline
The configuration baseline is what is actually deployed to a collection of machines. Click the Create Configuration Baseline button in the ribbon to launch the creation wizard. Type a name for the CB, then click the Add dropdown, select Configuration Item, select the CI you created earlier, click the Add button, then click OK.

Deploy the Configuration Baseline
Click on the Configuration Baseline, then click Deploy in the ribbon. Check the remediation option checkboxes so the remediation script will run on non-compliant systems. Choose a collection to deploy to, configure a schedule, and click OK to complete the deployment.

Client Side
Once a machine policy is cycled, clients will have a new entry in the Configuration Manager Control Panel Applet. This is most easily accessed by typing control smscfgrc in the run command. The Configurations tab contains the assigned configuration baselines, including the last evaluation and compliance status. You can run the configuration baseline on demand by clicking on the baseline, then clicking the Evaluate button.
Verification
You can verify the licensing on a machine by entering the following in a command prompt.
slmgr.vbs -dliYou can also see the status of the deployment within MEMCM monitoring, Deployments section. I am sure there are plenty of other great ways to report on the status of the deployment. Feel free to add any input within the comments. Thanks!
